How to share wifi password
If you’re trying to share your Wi-fi password with someone else, here are some tips to make it easier. First, make sure your device is connected to the same Wi-Fi network as the person you’re giving your password to. Next, select the Wi-Fi network you want to share the password with on both devices. Then, tap the Share Password button on either device. You’ll see a list of options, including allowing others access to your Internet connection via mobile data. Tap Allow Access and enter your password. If you don’t want to allow anyone to use your Internet connection, tap Deny Access.
How to Share Your Wi-Fi Password From Your Phone?
If you’re looking to share your Wi-fi password with someone else, there are several ways to do it. For example, you could text your friend your Wi-Fi password. Or, you could write it down on paper and give it to him/her. But what if you don’t want to share your Wi- Fi password with anyone? What if you want to keep it secret? Well, you can still share your Wi-Fi connection without giving away your password. Here’s how:
1. 2. 3. Tap the name of the network you’d like to share your Wi-FI password with.
4. Scroll down and tap “Share my Internet Connection.”
5. Enter your Wi-Fi password to connect.
6. Now, you’ve shared your Wi-Fi password with another device.
Want to keep your neighbors out of your Wi-Fi?
Here are some tips
In addition to keeping your home network safe from hackers, it’s important to make sure that no one else can access your Wi-Fi either accidentally or intentionally. This includes guests, roommates, family members, and even people living next door. If someone gets into your Wi-Fi, they could potentially gain access to sensitive information like banking info, passwords, and credit card numbers.
To prevent this from happening, we recommend taking the following steps:
• Use strong passwords and unique usernames. Avoid using common words or phrases such as “password” and “123456” for your username and password. Instead, use something that won’t be easily guessed. Also avoid using personal data like birth dates or phone numbers.
• Keep your router locked down. Make sure that you’re set up to require a password every time someone connects to your Wi-Fi. You can do this by disabling guest networks, changing the SSID name, and/or turning off Wi-Fi completely.
• Change your default login credentials. Once you’ve enabled password protection, you’ll want to change your default login credentials to something less obvious. For example, if your default login is “admin,” try switching it to “root.”
• Set up a firewall. A firewall keeps unauthorized devices from connecting to your device via Wi-Fi. To learn how to install a firewall on your computer, tablet, or smartphone, read our guide here.
If you’d rather skip the extra step of setting up a firewall, there are free third-party apps that can help you block unwanted connections. Some popular ones include:
• Firewall Plus (iOS) – $0.99
• NetGuard (Android) – Free
• WiFi Security (Windows 10) – Free
• Wifi Security (Mac OS X) – Free
• ZoneAlarm Personal Edition ($49.95)
• Norton Family Pack ($59.95)
• AVG AntiVirus Premium ($19.95)
• Avast Premier ($29.95)
• Bitdefender Total Security ($39.95)
How to turn off Wi-Fi when not in use?
You may have noticed that your Wi-Fi automatically turns itself back on after about 30 minutes of inactivity. That’s because most routers will shut off their Wi-Fi signal if they haven’t been used for at least 30 minutes.
How to share Wi-Fi from iPhone to iPhone?
When it comes to sharing Wi-Fi networks via Bluetooth, there are some things you just don’t want to do. For example, you shouldn’t use the same password for multiple accounts because someone could easily access those accounts. But what about sharing Wi-Fi networks? You might think that’s okay since you’re not sharing anything sensitive like credit card information, but you’d be surprised how many people still share their wireless network credentials.
Apple’s iOS 11 update includes a feature called “Share My Network,” which allows anyone nearby to connect to your Wi-Fi network without needing to enter a password. This works over Bluetooth and Wi-Fi, and it doesn’t require you to pair devices together. To make sure everyone knows where the network is located, you can even add a custom name to it.
Turn on “Share my internet connection.” Then tap the blue button to turn off Wi-Fi encryption. Now anyone nearby will see your Wi-Fi network name and password, along with your device’s MAC address. If you want to stop sharing, simply turn off Wi-Fi again.
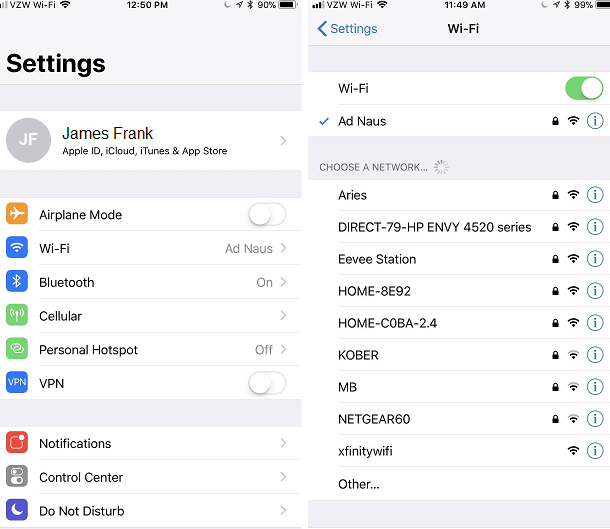
If you want to share your Wi-Fi password, you’ll need to go into each individual app that uses it. Tap Add New Network, type in the name you want to give the network, and choose whether you want to allow guests to join. Then select the security mode you want to use. Finally, scroll down and tap Allow Guests to Connect.
Type in the name you want for the network, and set up the security settings you want. Finally, scroll down to the bottom and tap Allow Other Devices to Join.
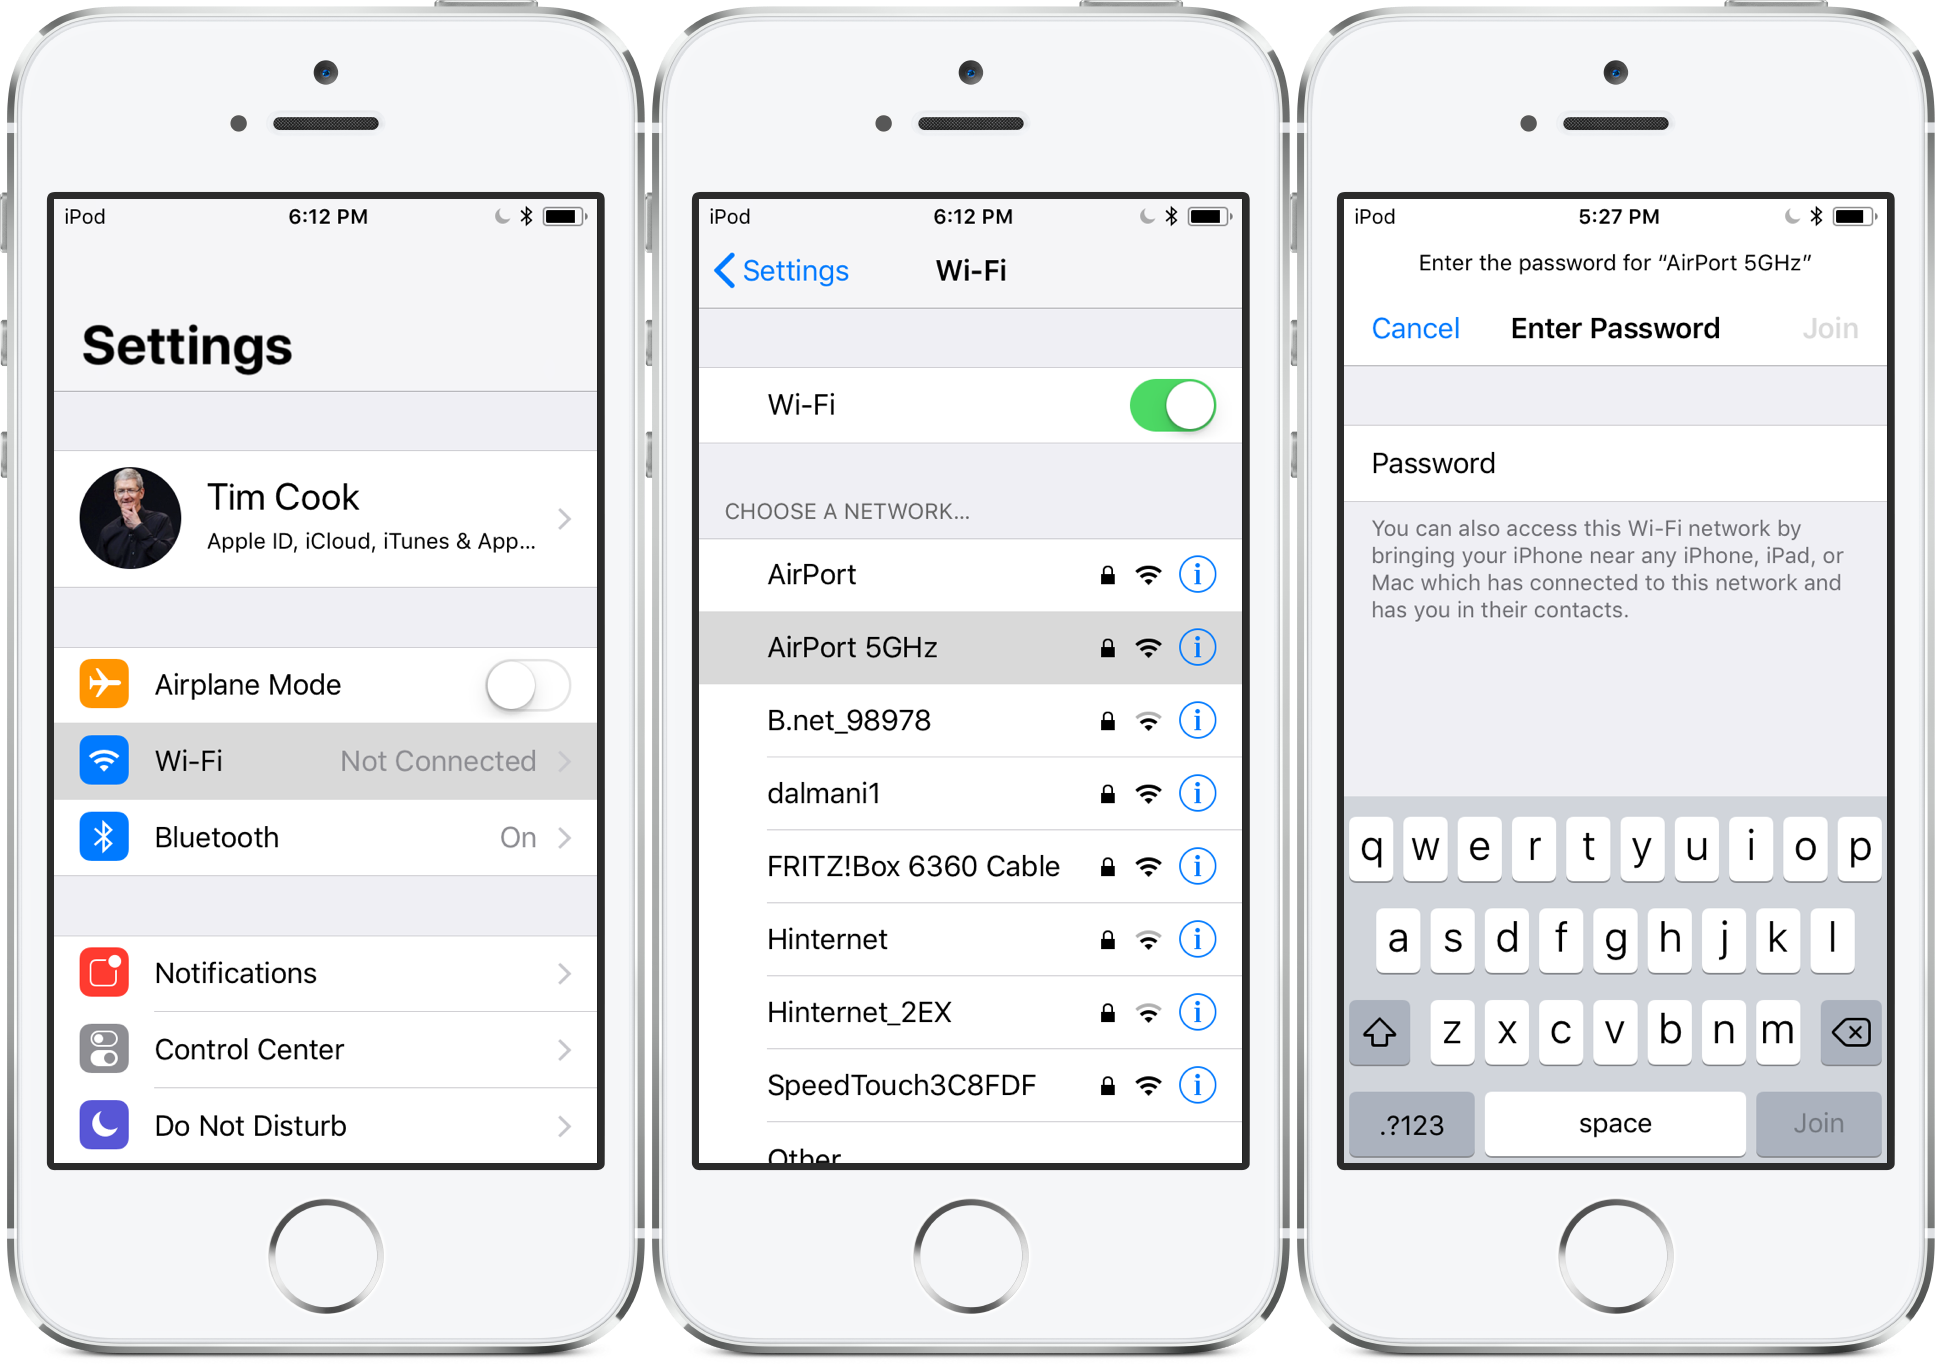
Requirements for Sharing Wi-Fi Passwords in iOS?
The process of sharing a wireless Internet connection over Apple’s AirDrop feature requires some additional steps beyond simply selecting the option. In fact, it sounds like a lot of work, especially considering that there are several ways you could go about doing it. However, once everything is set up properly, it seems pretty simple. Here’s how it works:
1. 2. Tap Wi-Fi Password Sharing
3. Select the networks you want to allow to connect to your network
4. Find the name of the network you want to share — it usually looks something like “Apple Wi-Fi”
5. Enter the password for that network into the text box under Wi-Fi Password Sharing.
6. If you don’t see anything happen, tap Share Again.
How to Share a Wi-Fi Password from iOS with Other iPhone and iPad?
If you’re looking to share a wi- fi password from one iOS device to another, it’s pretty easy. Just follow the steps above. But there are some things you’ll want to know about sharing a wi-fi password.
First off, make sure the devices being used are capable of sharing a wi-fi connection. If they aren’t, you won’t be able to do anything. You’ll see a warning like “This device isn’t compatible with this feature.”
Also note that you cannot share a wi-fi connection from an Apple Watch to an iOS device, nor can you share a wi-fi from an Android Wear watch to an iOS device.
But if you’ve got an older iPhone or iPad running iOS 10 or later, you may be wondering whether you can share a wi-fi network password from one device to another. And according to our tests, yes, you can. We tested this out on an iPhone 7 Plus running iOS 11, and it worked just fine.
You can even use this method to share a wi- wifi password from one iPhone or iPod touch to multiple iPads or iPhones. In fact, we tried it out ourselves, and it works great.
The only caveat is that you must connect the two devices physically together. So if you want to share a wi-f i password from one iPhone to several iPads, you’ll need to position those devices very close to each other.
Does this work sharing wi-fi passwords from hidden SSID networks?
If you’re trying to connect to someone else’s wireless network without asking permission, it might be easier to ask nicely. You can do this by sending a text message to one of the devices on the network. If you don’t know what the SSID of the network is, you can use a free tool called Wifi Analyzer to find out. Once you’ve found the SSID, send a text message to the number associated with the router, and follow the prompts.
Can you see the wi-fi password of a router from an iPhone or iPad?
Apple did away with the ability to easily see the passwords of nearby Wi-Fi networks in iOS 12. This feature was removed due to security concerns, but it looks like Apple might bring it back in a later update.
While you can share the wi fi password of connected routers in newer versions of iOS, you cannot actually view the password from an iPhone or an iPad. You can however access the information via the Settings app.
The change came about because Apple wanted to make sure that people could no longer use the device to spy on others.
What if I forget a wi-fi password, can I still share it?
Wi-Fi networks are great because they allow us to connect our smartphones, tablets, laptops, etc., to the internet without having to pay for data plans. But sometimes we want to use a specific network even though we don’t know the password. For example, maybe you’re out somewhere and you want to check email or download some apps. Or perhaps you forgot the password for your home Wi-Fi network. In those cases, there’s no easy way to access the network unless you know the password.
But what if you could just share the password with someone else? Well, you can do exactly that thanks to a feature called “Guest Network.” This works by sharing your current connection with another person. If you’ve ever used Guest Network, you probably noticed a little icon in the upper left corner of your screen. When you tap it, you’ll see a list of nearby Wi-Fi networks. From here, you can choose one to join. Once you’re connected, the guest network password will automatically be sent over to you via text messages.
Now, depending on how many people are connected to the same network, you might receive multiple texts. So if you’re trying to share a password with someone who has their own phone, you may have to wait until they get a chance to read the message.
How does this work?
When you first set up your new iPhone, you’ll notice a small green dot next to your name in the Contacts app. Tap that and then select Add Person. Next, enter the contact’s name and tap Done. Then, go into the settings menu and scroll down to the bottom. There should be a section titled Personal Hotspot. Here, you’ll see a toggle switch labeled Share My Connection. Tapping it will turn on Guest Network mode.
If you already have a personal hotspot enabled, you won’t need to do anything. However, if you haven’t yet turned on your personal hotspot, you’ll need to enable it before you can start using Guest Network. Turn on the toggle switch to activate the feature.
Once you’ve done all that, you can now share your Wi-Fi password with anyone else who wants to connect to your network. Just send them a text message containing the word “guest” followed by your Wi-Fi password. They’ll be able to log onto your Wi-Fi network as long as they remember to include the word “guest.”
You can also turn off Guest Network at any time by turning off the toggle switch.
Is this safe?
Yes! The only thing you need to worry about is whether or not your friend knows the Wi-Fi password.
How else can you see a wi-fi password?
If you forget your Wi-Fi password, it could take hours to find it. You can try resetting the router, but most people don’t know how to do that. Or maybe you had a different login password for the same Wi-Fi network and now you want to change it. Whatever the case, there are some tricks you can use to recover your lost WiFi password. Here’s one way to do it.
1. Open Safari on your iOS device.
2. Type “www.google.com” into the address bar.
3. Click Go.
4. Enter your desired search term (for example: “Wi-Fi Password Recovery”).
5. Click Search.
6. Scroll through the results until you find the page that contains the information you were looking for.
7. Copy the URL from the top right hand side of the browser window.
8. Paste the URL into a new tab on your desktop computer.
9. Right click on the link and select Save Link As…
10. Rename the file to something like “WifiPasswordRecovery.html”.
11. Drag the file to your Desktop folder.
12. Double-click the file to open it.
13. Select the option to save the file as an HTML document.
14. Now when you type www.google.com into the address bar, you’ll be taken directly to Google’s homepage.
15. On the home page, type “password recovery” into the search box.
16. Click the blue button that says “Search Google”.
17. A list of websites related to password recovery will appear.
18. Choose the website that best suits your needs.
19. Follow the instructions provided on the site.
20. Once you’ve completed the process, close the browser and repeat steps 1 – 19 to retrieve your original Wi-Fi password.
Can I manually bring up the wi-fi sharing password screen in iOS?
iOS 11 added some security features to help protect you against hackers trying to access your personal information while you’re away from home. One such feature is called “Wi-Fi Password Sharing,” which allows you to automatically connect to public networks without needing to enter your network credentials every single time. But there are still ways around it, even if Apple doesn’t want you to know about them.
The good news is that there are several methods to easily enable Wi-Fi Password Sharing on iPhone X, iPhone 8/8 Plus, iPad Pro 9.7″, and iPad Air 2. Here’s how to do it.
This method works best if you don’t already have a strong password set on your router. If you do, however, you’ll have to change the password yourself.
Method #2 – Go into the Wi-Fi settings on your phone and turn off the option to use a passcode. Then go to the Wi-Fi setting again and turn on Wi-Fi Password Sharing.
If you choose to disable the passcode, you won’t be able to log into the router via Safari anymore, but you can still connect to the router using Chrome or Firefox on Android.
Can you share your Wi-Fi password from Macbook to iPhone?
Yes. If you use both iOS 10 and macOS Sierra, there are some ways to make it easier for one device to connect to another. For example, you can set up a shared Wi-Fi network between your Macbook and iPhone. You can do this either manually or automatically. Let’s look at how to do each method, starting with manual setup.
Click on the Wi-Fi tab and select the Shared section. From here, you can add a name for the network and choose what type of security you want to use (WPA2 Personal/Enterprise). Next, turn on the option to Allow guests to join networks. Finally, enter the IP address of the router into the field labeled “Wi-Fi hotspot host.”
Now let’s take a look at automatic setup. Tap on the Wi-Fi network named “Shared,” then tap on the gear icon. Now, scroll down to find the option to Turn on auto-connect. Once enabled, you’ll be able to connect to the Wi-Fi without having to enter the password every time.
#1 – How to Transfer Photos from Your Phone to Macbook
Your phone is full of photos, videos, music and apps. But sometimes you don’t want to carry everything around in your pocket. Instead, you’d like to keep just a few things on your computer. Here’s how to move files from your phone to your Macbook.
How to Share Passwords on Android?
The internet is full of people sharing their Wi-Fi passwords online, but most of those sites are filled with malware. If you’re looking to share your password without having to worry about security issues, there’s an easy way to do it.
Step 2: Tap Add New Connection.
Step 3: Type in the name of the shared connection, then tap Next.
Step 4: In the next step, tap Advanced Options.
Step 5: Under Access Point Name, type in the name of your router, followed by the word “Shared” (without quotes).
Step 6: Scroll down and tap the checkbox for Shared Key Mode.
Step 7: Enter the shared key in the text field below.
Step 8: Tap OK.
Step 9: You should now see the newly created Wi-Fi connection listed under Connections.
Step 10: To connect to this shared connection, simply follow the same steps above, except instead of tapping Add New Connection, tap Connect Automatically.
Note: The shared connection may not work immediately after creating it. It might take a few minutes before the new connection appears in the list of connections.
How to Share Passwords on iOS?
If you’ve ever wanted to share the passwords for your home wi-fi networks with friends, family members, or coworkers, you know how frustrating that can be. Sure, there are plenty of apps out there that let you do just that, but none of them work across platforms like iPhones and iPads. And even if they did, you’d still have to remember the passwords yourself.
Thankfully, there’s a way around this. On iOS 11, you can now share your Wi-Fi passwords with others without having to type them in — assuming they’re using an Apple device, of course.
To start off, make sure you’re logged into iCloud with your Apple account. Scroll down to “Wi-Fi Options,” tap the name of whichever connection you want to share, and then tap “Share Password.” Now, you’ll see a list of people you can share the password with. Select the ones you want, enter their email address(es), and then tap “Done.” Your friend or family member will receive an automatic notification that says, “Hey, I’m about to share my Wi-Fi password with.” From there, they’ll need to tap “Accept” in order to access the network.
You can’t actually view what the password is for your network, but hopefully you won’t need to anyway; most routers will display the password in plain text on their setup screens.
How to Share Passwords on Windows?
Windows doesn’t really make it very easy to quickly share your wireless network password with someone else, even though you could see it on screen, and you could type it into an email, or send it over an instant messaging app. But there are ways around that. Here’s how to do it.
First up, go to the Start menu, and select Control Panel. Then navigate to the Network and Internet section, and under Network and Sharing Center, click on the name of the WiFi network you want to connect to. This opens up the properties window, where you’ll see a list of options. Scroll down to the bottom of the window, and click on the Security tab. Now scroll down again, and click on the Show Characters box. If you don’t see the Password textbox, just keep scrolling. You’ll eventually reach it.
Now enter the password into the Password textbox, and press Enter. You’ll notice that the character boxes disappear, and the password will now be displayed in plaintext. Copy and paste it into whatever form of communication you use to share passwords, such as an email, or IM client.
How to Share Passwords on macOS?
If you’ve ever shared a password on iOS or Android, you know how easy it is to accidentally give away someone else’s information. But what about on macOS? Well, there are a few things you can try to make sure you don’t hand over your login info to strangers. Here’s everything you need to know.
Open System Preferences, and select Network from the left side of the window. Click on the name of the Wi-Fi network you want to connect, and then click on the Advanced button at the top right corner of the window. In the dialog box that pops up, click on the Authentication pop-up menu, and choose Require Password. That should prevent anyone who isn’t already connected to your network from accessing it without entering the correct password.
If you still feel like you might have given out your password to some stranger, here’s another trick: Go back to the Network preferences window, and click on your Wi-Fi network. Under the General tab, you’ll find a new option called Allow this computer to remember passwords. Make sure that’s turned on, and then close the window. When you next open it, you won’t be prompted to enter your password anymore.